Friday 30 November 2007
Conclusion
In conclusion I felt that as a group we, on the most part, worked well. Initially there were some quite distinct creative differences, but we managed to compromise and agree in our different views for the story.
Texturing continued
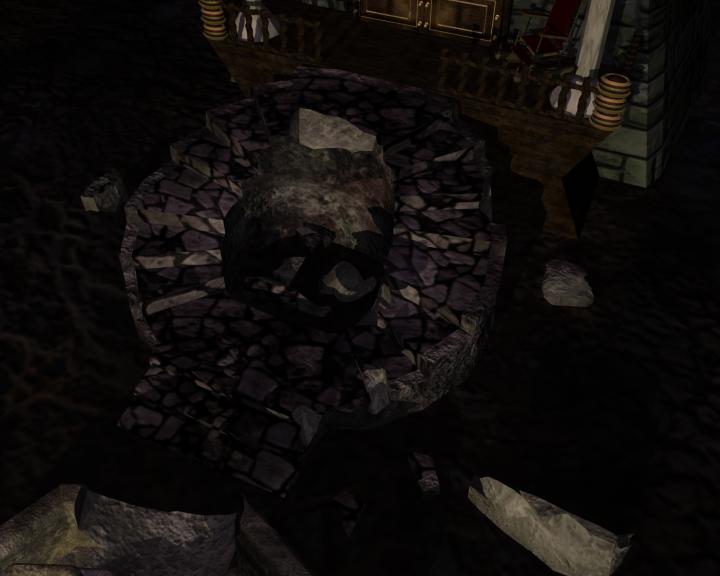
Finally here are my steps, which have managed to evade this blog sints the beginning of the project! To texture these i used the spherical map for the inside and outside of the steps and planar mapped the rest using the Y axis view port and the perspective view. Dan.C then crumbled the steps using the booleans tool.

Texturing Continued
Next up to model was the Ballroom table and chandelier. These are two of my favourite items I've modeled, even tho i had trouble modeling the table and texturing the chandelier. Below is a final render of the ballroom, displaying my table and chandelier.
 Here are two shots of my chandelier in action with Chester! Initially i found a stain glass texture, which look awful, and more complicated then need be. So i made a basic bump map, using the glass filter in photoshop. I applied that bump map to each plane and coloured the plane in Maya, making it transparent and reflective. It took me a loooong time to realise how easy it could be, haha!

 Below is my table i modeled and textured. I basically planar mapped the top faces with a texture i made from a photo i took in photoshop. For the wood texture i used the cutout style, and cylindrical mapped the edges so the grain wouldn't get stretched as it goes round.


 Here are two shots of my chandelier in action with Chester! Initially i found a stain glass texture, which look awful, and more complicated then need be. So i made a basic bump map, using the glass filter in photoshop. I applied that bump map to each plane and coloured the plane in Maya, making it transparent and reflective. It took me a loooong time to realise how easy it could be, haha!
 Below is my table i modeled and textured. I basically planar mapped the top faces with a texture i made from a photo i took in photoshop. For the wood texture i used the cutout style, and cylindrical mapped the edges so the grain wouldn't get stretched as it goes round.

Texturing Contiued
So, this is the front of the house!! towers'n'all! I had quite a bit of trouble with texturing this house. I wanted it to have a separate texture on it from the towers, however, this was quite the failure as i couldn't make one good enough that we all liked.
 Here are a few of the textures that i tryed out but didn't like. I thought that they were either to plain or to busy.
Alas, in the end we decided that it would be best if we kept with the tower texture. I simply tweaked the hue so there was a subtle separation from the house and towers. To texture it i cylindrical mapped the walls and shacks on the roof, when not planar mapping the planks


Texturing Continued
I went on to model the bridge that joins onto the side of one of the towers. From a photo i took in Barcelona i created a Texture using our cutout style we developed. I wanted the tower to look as tho it was built into the towers rather then it being part of the towers. To do that i made the texture a slightly different colour to the towers, along with using a different brick texture.
 I felt as tho it was too bright in contrast with the towers, so i changed the hue to a darker purple which i felt look better.
 Having planar mapped the sides of the bridge I did the same for the path of the bridge with an awesome texture, which sadly does not appear in the final film, apart from on the steps in the courtyard. I think that I've learnt to plan out the camera angles in future projects as we spent allot of time texturing, and even modelling, that wasn't necessary.

Monday 19 November 2007
Texturing continued!
Below are the support beams form the towers. To texture these i did a plainar map, having applied the cut out technique, bump and specular map to a wooden texture and onto the beam i transferd the texture to all the other beams.


next up was the bell-less bell tower.


next up was the bell-less bell tower.


Texturing continued!
After the towers i continued on to texture the bridges at the top of the towers. Using the same texture from the towers for continuity, i merged it with a separate texture to have some variation in the brick work. I UV mapped each face using the plainar mapping. However photoshop's coloring is bodged and it saves a different less saturated colour when you save, rather then the one you edit. As a result it looked very grey and untextured, booo!! The center also had to be quite stretched from the way the texture was made, which looked quite rubbish to i thought.


After the bridges i textured the roof...Which i really hate. I might try to re-do that if i have time, even though Anna and Dan.C like it.


After the bridges i textured the roof...Which i really hate. I might try to re-do that if i have time, even though Anna and Dan.C like it.

Beginning of texturing!
I began to texture the exterior before doing my individual objects, just down to preference really. Below is the tower that i modeled, although Dan.C slightly edited the tower height and curve by adding a spine joint in the tower and re-curving it. Also to note, i didn't model the bridges above or the chambers. Taking a texture i took in Barcelona into Photoshop i re-applied the technique Anna, Dan.C and i produced in the early stages of development for out texture '"style", which is a cut out look, that has some detail behind it. Making it tileable and applying the specular and bump map to it works really well at achieving the relief look. I UV mapped the tower up to a point at the bottom where it got to narrow and unnecessary to texture. After i simply transferred the texture from one tower to the other three. I applied the same technique to the Chambers on top of the towers and the bricks around the windows and doors.


Modeling i've done to date part.5
My last object to model was the chandelier for the ballroom, i didn't know quite where to start with it but Dan.C had the idea of having a picture of the glass beads on a place and have the black transparent to make things easier for everyone. However... I personally didn't like the effect it gave off so i modeled a Crystal and duplicated it...and duplicated it...and grouped it... and duplicated it, you get the idea. Basically, there were allot of polygons buy the time i finished and then there was the issue of animating them when Chester jumps on the chandelier. no one particularly wanted to attempt that and the render time was also really slow... goodbye crystals.


Hello stiff lighting with no crystals! having gone in a completely different direction in design, i think that this is actually really cool and low poly! I added spirl's on each corner for decoration, which eventually came in handy for when it came to having something to connect the chains to from the sealing.


Modeling i've done to date part.4
Below is my chair i made for the ballroom, i struggled getting the chair to look how i had it in mind. As a result i don't really like it, but i had to move on because there wasn't much time left and there is still loads to do. If there is time i will go back and change it, but the chances of that aren't to good!

Below are the front doors for the front of the house. I was inspired but a door i saw in Barcelona, there is a reference pic at the beginning of my blog. This was relatively simple to make. I created the door knobs with the CV curve tool. Initially i had twice as many knobs on the door but as a result of loads, obviously to many polygons on the door, rendering took to long. It still looks quite basic but after texturing it will hopefully look allot better!


Below are the front doors for the front of the house. I was inspired but a door i saw in Barcelona, there is a reference pic at the beginning of my blog. This was relatively simple to make. I created the door knobs with the CV curve tool. Initially i had twice as many knobs on the door but as a result of loads, obviously to many polygons on the door, rendering took to long. It still looks quite basic but after texturing it will hopefully look allot better!


Friday 9 November 2007
Really cool video!!
Here is a really cool animation i found that has a basic environment, but cleverly animates itself along with an narrators voice and his emotion. it has some really nice steady camera motion to.
via videosift.com
via videosift.com
Modeling i've done to date part.3
Below I've made a water fountain, which goes in the center of the courtyard. This was actually the easiest thing to make at this point in time. I basically used the 'create CV curve tool' and drew out a line, which i wanted the poly surface to follow when i rotated it 360 degrees. I then selected various edges and added bevel or softened them. It still looks pretty plain but after i UV map it and crumble it it'll look better i hope!!


After my fountain i made the main gate and fence that will go around the exterior of the house and courtyard. Its not quite finished being modeled yet but its close. I actually really like how its turned out so far. I created the bars in the fence and gate using the create CV curve tool and extruding a face of a pentagon up the line i drew, after which i edited the vertex's to style it out a bit better.


After my fountain i made the main gate and fence that will go around the exterior of the house and courtyard. Its not quite finished being modeled yet but its close. I actually really like how its turned out so far. I created the bars in the fence and gate using the create CV curve tool and extruding a face of a pentagon up the line i drew, after which i edited the vertex's to style it out a bit better.


Modeling i've done to date part.2
After modeling the stair banister i had to model statues for the courtyard as Chester, the gargoyle, would land and spring off them as soon as he falls from the roof. We decided to keep the statues really basic, as tho they were sculpted roughly. Rather than modeling two i only modeled the one and put a skeleton in him, so i could pose him, duplicate and re-pose the second statue. the statues are both modeled so that when one falls they...interact, with eachother.


I went on to model the garden furnature, ala table and chairs. initially i wanted to make a french style coffee table - the iron vine style furnature - but it was really hard to create. I moved on to something more simple and i think it actually works better with the theme of the house, looking more gothic.


I went on to model the garden furnature, ala table and chairs. initially i wanted to make a french style coffee table - the iron vine style furnature - but it was really hard to create. I moved on to something more simple and i think it actually works better with the theme of the house, looking more gothic.
 To make the chairs i took the table and shrunk it down for the seat of the chair, rather than re-model it all again. i duplicated the seat again and shufled and streched the planes about for a tall back. As a result i think the table and chairs look quite consistant as a set.


Modeling i've done to date part.1
Here's an updated version of my ballroom table, where I've coloured the corners with a basic blin texture. I still have to sort out the four shadowed segments in the table because there are some faces inside that need to be deleted. Grrr.


After i modeled the table i started to build stuff for the court yard, i began by modeling steps but the screen bumps have gone missing, so I'll have to re-do them pfffft. However, after modeling the steps i made the banister for the steps. They were inspired by the balconies from the building in Barcelona, which i cant remember the name of so I'll update this bit later when i find out!! I just simply made a plane and extruded the edges and bent them as i went, getting the mangled steel look that i wanted.


Friday 2 November 2007
My rough storyboard segment
 This is the part of storyboard i drew out for the group. This part being the beginning 9 key shots with the setup shot, Chester breaking away from the house and falling into the courtyard.
Subscribe to:
Posts (Atom)